1. 개요
유니티로 게임을 만들다 보면 Vector의 Position을 조작하는 일이 수도 없이 많다. 게임 오브젝트의 Position은 Transform 컴포넌트가 지원하는 자체적인 Move-Tool 도구로 Scene View에서 쉽게 위치를 조작할 수 있지만, 일반적인 Vector2 혹은 Vector3 타입의 필드의 값을 변경할 때는 수동으로 값을 직접 입력해야 한다. 이는 굉장한 불편함이다. 몰론 Vector 구조체가 아닌, Empty GameObject를 생성 후 Transform 타입의 필드에 할당하여 조작하면 되지만 Vector 구조체 단독으로 사용하는 것보다는 메모리, 성능 등 효율성이 다소 떨어진다. 구조체의 성능적인 장점을 최대한 활용하는 것이 아무래도 좋지 않겠는가? 아래 장면을 보자.
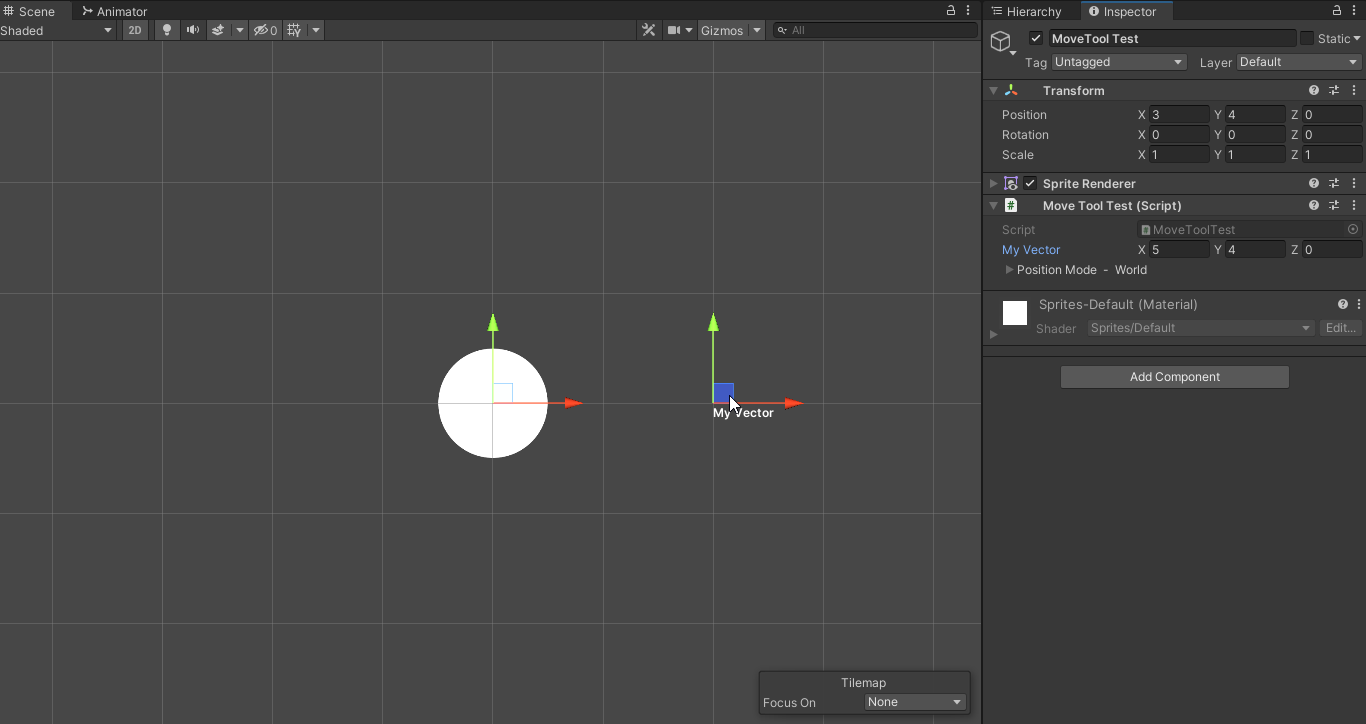
위 장면을 보면 알 수 있지만 Transfrom 컴포넌트를 조작하는 것이 아닌 Vector3 타입의 직렬화된 필드 자체를 Scene View에서 조작하고 있다. 위와 같이 필드로 선언되어있는 Vector 구조체를 Scene View의 Move-Tool 도구를 활용해 조작하는 방법을 알아보자.
Releases
이 블로그는 Release 1을 기준으로 작성되었기 때문에 deprecated 된 내용이 포함되어있습니다. 업데이트된 버전을 이용하시기 바랍니다.
아래는 제가 배포하는 공식 릴리스입니다.
| Version | Release Date | Source | C# |
|---|---|---|---|
| main(unstable) | – | main | 7.0 or higher |
| Release 2 | 2022-02-16 | release-2 | 7.0 or higher |
2. 구현에 앞서 필요한 지식
우리가 흔히 유니티에서 인스펙터를 간편히 조작하기 위해 아래와 같이 필드에 Attribute 를 정의한다.
1
2
[SerializeField]
private Vector3 privateVector;
위 코드에서 정의한 Attribute 는 유니티에서 가장 자주 쓰이는 Attribute 중 하나인 SerializeField이다. 이 Attribute 는 private 필드를 인스펙터 등에서 조작 가능하게 직렬화 시켜준다. 이처럼 Vector 구조체 필드 역시 복잡한 과정 없이, 간단히 Attribute 의 선언만으로 쉽게 Scene View에서 조작하고 싶다. 이를 위해 위와 같이 Attribute 를 만들기로 결정했다.
Attribute(특성)를 어떻게 구현할까? MS 공식 문서 특성(C#)에서는 아래와 같이 기술하고 있다.
특성은 메타데이터 또는 선언적 정보를 코드(어셈블리, 형식, 메서드, 속성 등)에 연결하는 강력한 방법을 제공합니다. 특성이 프로그램 엔터티와 연결되면 리플렉션 이라는 기법을 사용하여 런타임에 특성이 쿼리될 수 있습니다. 자세한 내용은 리플렉션(C#)을 참조하세요.
위 내용만 봐서는 프로그래밍에 깊은 지식과 이해가 있지 않은 한 이해하기 어렵다고 생각한다. 또한 Reflection(리플렉션)이라는 개념도 등장한다. 이들은 C#의 고급기술에 속한다(뇌피셜). 나도 처음에는 다소 생소하고 어려웠었다. 그러나 Move-Tool 구현을 위해 Reflection 에 대해 알아갈 수록, 정말 대단한 기능이라고 느껴질 정도로 강력한 기능이었다. 이에 대해 간단히 알아보자.
Atribute(특성)
먼저, Attribute에 대해 내가 이해한 핵심적인 요약은 아래와 같다.
Attribute 는 프로그램이 이해할 수 있는 주석이다.
우리가 주석을 작성하는 이유는 개발하는 나, 코드를 읽는 다른 개발자가 코드의 내용을 이해할 수 있게 하기 위해 작성한다. Attribute 역시 그러하다. 프로그램에게 이 클래스, 인터페이스, 메서드, 프로퍼티 혹은 필드가 이러한 특성을 지니고 있다라고 알려주는 역할을 한다. 예를 들면 C#에서 가장 유명한 Attribute 중 하나인 Obsolete는 프로그램 혹은 컴파일러에게 더 이상 사용되지 않는다라고 알려준다.
마찬가지로 우리가 Vector 구조체를 Scene View에서 조작할 수 있게 하기 위해 Attribute 를 만들려고 한 이유도 이와 같다. 즉, 이 필드는 Scene View에서 Position을 조작할 수 있는 Move-Tool 도구를 지원해야한다고 프로그램에게 알리기 위해서이다.
Reflection(리플렉션)
그렇다면 누가 어떤 Attribute 를 가지고 있는지 알 수 있을까? C#에서는 Reflection(리플렉션) 이라는 기법을 통해 가능하다. Reflection 은 런타임에 어떤 타입에 대한 정보를 뜯어볼 수 있도록 해준다. 이는 굉장한 기능이다. 우리가 선언한 클래스 혹은 인터페이스를 비롯해 각종 메서드, 필드에 대해 런타임에 확인하고 조작할 수 있다는 것을 의미한다. 어떤 클래스 내에 선언한 필드에 어떤 Attribute 가 할당되어있는지 역시 런타임에 조사가 가능하다.
이것이 가능한 이유는 바로 아래와 같다.
C#의 모든 타입의 Base Class인
ObjectClass에Type GetType()메서드가 선언되어 있다.
즉, 모든 형식의 타입에 대해 정보를 열람할 수 있다.
앞서 말했듯이 Reflection 은 어떤 타입에 대한 정보를 뜯어볼 수 있도록 해준다. 즉, 어떤 타입에 대한 정보를 담고 있는 보관함이 필요한데, 그게 바로 System.Type 클래스이다. Type 인스턴스를 통해 어떤 타입의 정보를 열람하고, 타입 멤버의 데이터를 얻거나 수정이 가능하다. 자세한 내용은 MS 공식 문서 리플렉션(C#)을 참조하기 바란다.
3. 전체 알고리즘
위에서 구현을 위한 지식을 간단히 소개했다. 필요한 문법은 아래에서 간단히 소개할 것이나, 자세한 내용이 궁금하다면 직접 문서를 참조하길 권장한다.
아래는 소스코드가 있는 Github 링크이다. 소스코드가 상당히 길기 때문에, Github Repository에서도 제공하였다.
4. MoveToolAttribute
먼저, 필요한 Attribute 를 선언하자. 나는 Scene View에서 Move-Tool 도구를 지원해준다는 의미로 MoveToolAttribute라는 이름으로 선언했다.
C#에서 Attribute(특성) 를 생성하기 위해서는 System.Attribute 클래스의 상속을 받아야 한다. 위 코드에서는 UnityEngine.PropertyAttribute를 상속받았는데 이 클래스는 Attribute클래스의 파생 클래스이다. 따라서 Attribute 를 만들 수 있다.
1
[AttributeUsage(AttributeTargets.Field, AllowMultiple = false, Inherited = true)]
위 코드는 우리가 만들려는 Attribute 의 특성을 기술하는 AttributeUsage 특성이다.
System.AttributeTargets은 C#에 정의되어 있는 enum 타입이다. 특성을 적용하는 데 유효한 애플리케이션 요소(클래스, 구조체, 메서드, 필드 등)를 지정할 수 있다. 참고로 AttributeTargets의 열거형 값은 AttributeTargets.Class | AttributeTargets.Method와 같이 비트 OR 연산으로 결합 하여 사용할 수 있다.
우리는 Vector 타입의 필드에만 적용할 거기 때문에 AttributeUsage의 생성자에 AttributeTargets.Field 값을 인자로 주었다. 이에 대한 자세한 내용은 MS 공식 문서 AttributeTargets 열거형에서 확인하기 바란다.
5. MoveToolAvailableAttribute
Vector 타입이 아닌 Vector 타입의 필드 및 컬렉션을 포함하는 커스텀 타입에서 Move-Tool 도구를 사용하고 싶을 때 정의해야하는 Attribute 이다.
Attribute 적용 대상은 class와 struct이다.
6. MoveToolEditor
MoveToolAttribute를 정의한 필드를 위해 Move-Tool(Position Handle)을 유니티 에디터의 Scene View에 생성 및 배치하는 기능을 구현한다. 이를 위해 커스텀 에디터를 만들어야 한다.
전체 알고리즘
C#의 Reflection과 Attribute 기능을 최대한 활용하여 구현했다.
참고로 흔히 에디터를 작성할 때 사용하는 Editor 베이스 클래스의 멤버인 serializedObject 프로퍼티나 기타 방법을 통해 얻을 수 있는 SerializedProperty 타입의 직렬화된 프로퍼티들을 전혀 활용하지 않는다. 이전에 이것들을 활용해 코드를 작성했었는데 아래와 같은 치명적인 문제가 있었다.
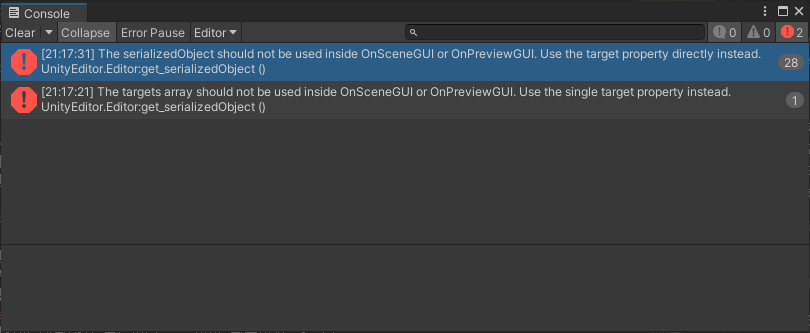
Unity 공식 문서 Editor.serializedObject의 설명
Do not use the serializedObject inside OnSceneGUI or OnPreviewGUI. Use the target property directly in those callback functions instead.
근데 이해가 안갔던 점은 MoveToolEditor를 다른 Editor에서 생성 후 OnSceneGUI를 호출할때에만 위의 Exception 발생했었다. 즉, 다른 Editor를 사용하지 않고 MoveToolEditor가 단독으로 사용되면 serializedObject를 OnSceneGUI에서 사용하더라도 Exception이 발생하지 않았다.
또한 Exception 메세지는 발생하지만 기능 자체는 정상적으로 동작했다. 그럼에도 계속 Exception 메세지가 콘솔창에 쌓이기 떄문에 결국 버그 수정을 위해 완전히 리뉴얼했다.
이 포스트에서 소개하는 코드는 리뉴얼된 버전으로 serializedObject를 사용하지 않고, C#의 순수 Reflection 기능만을 활용해 알고리즘을 구현하였다.
아래는 MoveToolEditor의 전체 알고리즘이다.
GetSerializedFields
어떤 타입의 모든 직렬화된 필드를 열거자로 반환한다.
1
2
3
4
5
6
7
8
9
10
11
12
13
14
// Return SerializedFields.
private IEnumerable<FieldInfo> GetSerializedFields(Type type)
{
    var fields = type.GetFields(BindingFlags.Instance | BindingFlags.Public | BindingFlags.NonPublic);

    // If it's the public field and doesn't have NonSerializedAttribute, then add it.
    // If it's the non-public field and has UnityEngine.SerializeField, then add it.
    var serializedFields =
        from f in fields
        where (f.IsPublic && f.GetCustomAttribute<NonSerializedAttribute>(false) == null) || (!f.IsPublic && f.GetCustomAttribute<SerializeField>(false) != null)
        select f;

    return serializedFields;
}
LINQ 쿼리문을 통해 필드들을 필터링했다. public 필드는 NonSerializedAttribute가 존재하지 않을 때, non-public 필드는 UnityEngine.SerializeField가 존재할 때 직렬화가 가능하기 때문에, 이에 대해 필터링 후 열거자 형태로 반환한다.
SetMoveTool
SetMoveTool() 메서드는 에디터의 Move-Tool 기능을 실행시켜주는 메서드이다.
1
2
3
4
5
6
7
8
9
10
11
12
13
14
15
16
17
/// <summary>
/// Run MoveToolEditor. You can use position handles of fields that have MoveToolAttribute in the unity editor scene view.
/// </summary>
public void SetMoveTool()
{
    var targetType = target.GetType();
    var fields = GetSerializedFields(targetType);
    foreach (var field in fields)
    {
        // Check if MoveToolAttribute is defined.
        var attr = field.GetCustomAttribute<MoveToolAttribute>(false);
        if (attr == null)
            continue;

        SetMoveToolAvailableField((field, -1), (field, -1), attr, this.target);
    }
}
위 코드에서 target은 inpected되고 있는 오브젝트로, 보통 유니티 에디터의 Hierarchy 창에서 선택한 오브젝트이다.
target 오브젝트의 모든 직렬화된 필드를 GetSerializedFields()를 통해 가져온다. 그 중 MoveToolAttribute가 존재하는 필드만 Move-Tool 기능을 구현하며, 이를 위해 SetMoveToolAvailableField() 메서드를 호출한다.
위 메서드에서 사용한 GetCustomAttribute<T>()는 System.Reflection의 확장 메서드로, 어떤 멤버에 정의되어 있는 Attribute 를 반환한다. MS 공식 문서 GetCustomAttribute<T>(MemberInfo, Boolean)
HasAvailableAttribute
해당 타입에 MoveToolAvailableAttribute와 SerializableAttribute가 정의되어 있는지 확인한다. 이는 커스텀 타입이 Move-Tool 기능을 사용할 수 있는지 확인하기 위한 메서드이다.
1
2
3
4
5
6
7
// Check if both MoveToolAvailableAttribute and SerializableAttribute are defined.
private bool HasAvailableAttribute(Type type)
{
    var available = type.GetCustomAttribute<MoveToolAvailableAttribute>(false);
    var seralizable = type.GetCustomAttribute<SerializableAttribute>(false);
    return available != null && seralizable != null;
}
IsVector
해당 타입이 Vector이거나 Vector 컬렉션인지를 확인하기 위한 메서드이다.
1
2
3
// Check if it's vector type or vector collection type.
private bool IsVector(Type type) => type == typeof(Vector2) || type == typeof(Vector3) ||
    typeof(IEnumerable<Vector3>).IsAssignableFrom(type) || typeof(IEnumerable<Vector2>).IsAssignableFrom(type);
AddIndexLabel
단순히 레이블에 인덱스 기호와 번호를 추가해주는 메서드이다.
1
2
3
4
5
6
7
8
9
10
11
12
13
14
15
16
17
18
// Add index label to this label parameter.
// e.g. Label [index]
private string AddIndexLabel(string label, int index, bool isFront = false)
{
    if (index >= 0)
    {
        if (isFront)
        {
            label = $"[{index}] {label}";
        }
        else
        {
            label += $" [{index}]";
        }
    }

    return label;
}
SetMoveToolAvailableField
드디어 메인 코드이다.
유니티 에디터의 Scene View에 Move-Tool 기능을 구현하기 위해 관련 요소를 파악한다. 최상위 필드에서 최하위 목록까지 내려가 최종적으로 구현 가능한지 조건을 따져 Move-Tool 기능을 구현하는 Top-down 방식의 메서드이다.
코드가 재귀호출 구조이며 상당히 복잡한 편이다. 일단은 대략적인 구조만 살펴보고 아래 설명을 본 후 다시 돌아와서 전체 구조를 살펴보는걸 권장한다.
1
2
3
4
5
6
7
8
9
10
11
12
13
14
15
16
17
18
19
20
21
22
23
24
25
26
27
28
29
30
31
32
33
34
35
36
37
38
39
40
41
42
43
44
45
46
47
48
49
50
51
52
53
54
55
56
57
58
59
60
61
62
63
64
65
66
67
68
69
70
71
72
73
74
75
76
77
78
79
80
81
82
83
84
85
86
87
88
/// <summary>
/// Set Position Handles in the unity editor scene view.
/// </summary>
/// <param name="top">top level field declared in the MonoBehaviour component</param>
/// <param name="current">current field checked now, current.obj is the instance where current.field is declared</param>
/// <param name="attr">defined for the top level field</param>
/// <param name="n">Don't set any value. It's the count of recursive calls.</param>
private void SetMoveToolAvailableField((FieldInfo field, int index) top, (object obj, FieldInfo field, int index) current, MoveToolAttribute attr, int n = 0)
{
    // If it's vector, call immediately SetPositionHandle() method and then terminate.
    if (IsVector(current.field.FieldType))
    {
        string label = string.Empty;
        if (attr.LabelOn)
        {
            label = string.IsNullOrEmpty(attr.Label) ? AddIndexLabel(top.field.Name.InspectorLabel(), top.index) : AddIndexLabel(attr.Label, top.index);
            if (top.field != current.field)
                label += $" - {(n > 1 ? AddIndexLabel(current.field.Name.InspectorLabel(), current.index, true) : current.field.Name.InspectorLabel())}";
        }

        SetVectorField(current.obj, current.field, label, attr.LocalMode);
        return;
    }

    var type = current.field.FieldType; //current field type

    // Array
    if (type.IsArray)
    {
        type = type.GetElementType();
        if (!HasAvailableAttribute(type))
            return;

        var serializedFields = GetSerializedFields(type);
        var array = current.field.GetValue(current.obj) as Array;
        for (int i = 0; i < array.Length; i++)
        {
            if (top.field == current.field)
                top.index = i;

            // Recursive call for each field declared in the element type of current array
            object obj = array.GetValue(i);
            foreach (var nextField in serializedFields)
                SetMoveToolAvailableField(top, (obj, nextField, i), attr, n + 1);
            if (type.IsValueType)
                array.SetValue(obj, i);
        }
    }
    // List
    else if (type.IsGenericType && typeof(IList).IsAssignableFrom(type))
    {
        type = type.GetGenericArguments()[0];
        if (!HasAvailableAttribute(type))
            return;

        var serializedFields = GetSerializedFields(type);
        var list = current.field.GetValue(current.obj) as IList;
        for (int i = 0; i < list.Count; i++)
        {
            if (top.field == current.field)
                top.index = i;

            // Recursive call for each field declared in the element type of current list
            object obj = list[i];
            foreach (var nextField in serializedFields)
                SetMoveToolAvailableField(top, (obj, nextField, i), attr, n + 1);
            if (type.IsValueType)
                list[i] = obj;
        }
    }
    // Just single field
    else
    {
        if (!HasAvailableAttribute(type))
            return;

        var serializedFields = GetSerializedFields(type);

        // Recursive call for each field declared in the current field type
        object obj = current.field.GetValue(current.obj);
        foreach (var nextField in serializedFields)
            SetMoveToolAvailableField(top, (obj, nextField, -1), attr, n + 1);

        // If current field is a value type, you must copy boxed obj to this field. It's because obj isn't the field instance itself, but new boxed instance.
        if (type.IsValueType)
            current.field.SetValue(current.obj, obj);
    }
}
현재 필드가 Vector일 경우
현재 필드가 Vector일 경우 Move-Tool 기능을 위한 Position Handle을 유니티 Scene View에 생성 및 배치하는 SetPositionHandle() 메서드를 호출하고 재귀호출을 종료한다. SetPositionHandle() 메서드는 뒤에서 자세히 설명할 예정이다.
1
2
3
4
5
6
7
8
9
10
11
12
13
14
// If it's vector, call immediately SetPositionHandle() method and then terminate.
if (IsVector(current.field.FieldType))
{
    string label = string.Empty;
    if (attr.LabelOn)
    {
        label = string.IsNullOrEmpty(attr.Label) ? AddIndexLabel(top.field.Name.InspectorLabel(), top.index) : AddIndexLabel(attr.Label, top.index);
        if (top.field != current.field)
            label += $" - {(n > 1 ? AddIndexLabel(current.field.Name.InspectorLabel(), current.index, true) : current.field.Name.InspectorLabel())}";
    }

    SetVectorField(current.obj, current.field, label, attr.LocalMode);
    return;
}
Vector가 아닌 단일 필드일 경우
먼저 위 SetMoveToolAvailableField() 메서드의 조건문 분기 중 else문 부터 보자.
Vector 타입이 아닌 커스텀 타입의 컬렉션이 아닌 단일 필드일 경우의 처리이다.
1
2
3
4
5
6
7
8
9
10
11
12
13
14
15
16
17
// Just single field
else
{
    if (!HasAvailableAttribute(type))
        return;

    var serializedFields = GetSerializedFields(type);

    // Recursive call for each field declared in the current field type
    object obj = current.field.GetValue(current.obj);
    foreach (var nextField in serializedFields)
        SetMoveToolAvailableField(top, (obj, nextField, -1), attr, n + 1);

    // If current field is a value type, you must copy boxed obj to this field. It's because obj isn't the field instance itself, but new boxed instance.
    if (type.IsValueType)
        current.field.SetValue(current.obj, obj);
}
현재 필드의 타입이 Move-Tool 기능을 이용 가능한지 확인하기 위해 앞서 정의했던 HasAvailableAttribute() 메서드를 호출한다.
이용 가능하다면, 현재 타입에 선언되어 있는 모든 직렬화된 필드를 GetSerializedFields() 메서드를 통해 가져온다.
현재 필드 인스턴스를 FieldInfo.GetValue() 메서드를 통해 얻은 후 object obj 지역변수에 할당한다.
현재 필드 타입에 정의된 각각의 직렬화된 필드에 대해 SetMoveToolAvailableField() 메서드를 재귀 호출한다.
이때, current 튜플 매개변수의 obj에 직전에 얻은 지역변수 obj, field에 현재 필드 타입에 정의된 각각의 직렬화된 필드, index에 인덱스를 인자로 넘겨준다. 현재 필드는 배열이 아닌 단일 필드이기 때문에 인덱스는 -1의 값을 준다.
FieldInfo.GetValue()
FieldInfo.GetValue() 메서드는 리플렉션의 핵심 기능 중 하나이다. 우리가 어떤 인스턴스와 그 인스턴스에 선언된 필드 정보를 알고 있다면, 그 인스턴스의 필드가 보유하고 있는 실제 값을 알아낼 수 있다. 반대로 FieldInfo.SetValue() 메서드도 존재한다.
이것은 정말 강력한 기능이다. 그 이유는 아래와 같다.
어떤 클래스 혹은 구조체 필드가
private이나protected등의 키워드를 통해 외부로부터 보호되고 있는 필드일 지라도, 그 필드에 대한 정보만 안다면, 외부에서 그 필드가 보유하고 있는 값을 알아내고 수정할 수 있다.
자세한 내용은 MS 공식 문서 FieldInfo.GetValue(Object) 메서드를 참조하기 바란다.
구조체에 대한 리플렉션
현재 필드 타입에 정의된 각각의 직렬화된 필드에 대한 재귀호출이 모두 끝났다면, 지역변수 obj 인스턴스에 대한 각각의 직렬화된 필드들은 모두 값이 변경되었다. 이때, 현재 필드가 구조체인 value type 이라면 문제가 발생한다.
현재 필드가 클래스라면 obj 지역변수는 곧 current.obj를 통해 얻은 실제 인스턴스 그 자체이다. 몰론 엄밀하게는 인스턴스에 대한 참조이다.
그러나 구조체라면 current.obj를 통해 얻은 인스턴스 참조가 아닌, 값만 동일한 박싱되어 새롭게 생성된 인스턴스이다. 이는 value type 의 박싱 언박싱 과정때문이다. 따라서 지역변수 obj를 변경하더라도 새롭게 생성된 인스턴스를 변경한 것이기 때문에 기존에 current.obj가 보관하고 있는 현재 필드는 변경되지 않는다. 따라서 변경된 obj 지역변수를 현재 필드에 복사해줘야한다.
위 이유로 구조체를 고려하지 않았을 때는 구조체에 대해서는 Position Handle 자체는 표시했지만 핸들을 움직이려고 시도해도 고정된채로 남아있었다.
Vector가 아닌 배열 혹은 컬렉션 필드일 경우
Vector가 아닌 배열 혹은 컬렉션 필드는 위 Vector가 아닌 단일 필드일 경우에서 소개한 내용의 연장선일 뿐이다. 단지, 현재 단일 필드에 대해서가 아닌, 배열 혹은 컬렉션의 각각의 원소에 대해서 재귀호출을 실행한다는 차이가 있다. 배열과 컬렉션은 원리가 완전히 동일하므로 여기서는 배열에 대해서만 코드를 제시한다.
참고로 이 코드에서의 GetValue(), SetValue()는 FieldInfo.GetValue(), FieldInfo.SetValue()가 아닌 Array.GetValue(), Array.SetValue()이다.
1
2
3
4
5
6
7
8
9
10
11
12
13
14
15
16
17
18
19
20
21
22
// Array
if (type.IsArray)
{
    type = type.GetElementType();
    if (!HasAvailableAttribute(type))
        return;

    var serializedFields = GetSerializedFields(type);
    var array = current.field.GetValue(current.obj) as Array;
    for (int i = 0; i < array.Length; i++)
    {
        if (top.field == current.field)
            top.index = i;

        // Recursive call for each field declared in the element type of current array
        object obj = array.GetValue(i);
        foreach (var nextField in serializedFields)
            SetMoveToolAvailableField(top, (obj, nextField, i), attr, n + 1);
        if (type.IsValueType)
            array.SetValue(obj, i);
    }
}
SetPositionHandle
벡터 타입의 필드나 컬렉션에 대해 Move-Tool 기능을 위한 Position Handle을 유니티 에디터 Scene View에 실제로 생성 및 배치하는 메서드이다.
1
2
3
4
5
6
7
8
9
10
11
12
13
14
15
16
17
18
19
20
21
22
23
24
25
26
27
28
29
30
31
32
33
34
35
36
37
38
39
40
41
42
43
44
45
46
47
48
49
50
51
52
53
54
55
56
57
58
59
60
61
62
63
64
65
66
67
68
69
70
71
72
73
74
75
// Add position handles of this field to unity editor scene view. This field is okay whether vector field or vector collection field.
private void SetVectorField(object obj, FieldInfo field, string label, bool localMode)
{
    // If it's local mode, then origin point is set to target(MonoBehaviour) position.
    Vector3 origin = localMode ? (this.target as MonoBehaviour).transform.position : Vector3.zero;

    var fieldType = field.FieldType;

    // Field
    if (fieldType == typeof(Vector3))
    {
        Vector3 oldValue = (Vector3)field.GetValue(obj);
        SetHandleVector3(label, origin, oldValue, obj, field, v => field.SetValue(obj, v));
    }
    else if (fieldType == typeof(Vector2))
    {
        Vector2 oldValue = (Vector2)field.GetValue(obj);
        SetHandleVector2(label, origin, oldValue, obj, field, v => field.SetValue(obj, v));
    }
    // Array
    else if (fieldType.GetElementType() == typeof(Vector3))
    {
        var array = field.GetValue(obj) as Array;
        for (int i = 0; i < array.Length; i++)
        {
            string temp = label;
            if (!string.IsNullOrEmpty(label))
                temp += $" [{i}]";

            Vector3 oldValue = (Vector3)array.GetValue(i);
            SetHandleVector3(temp, origin, oldValue, obj, field, v => array.SetValue(v, i));
        }
    }
    else if (fieldType.GetElementType() == typeof(Vector2))
    {
        var array = field.GetValue(obj) as Array;
        for (int i = 0; i < array.Length; i++)
        {
            string temp = label;
            if (!string.IsNullOrEmpty(label))
                temp += $" [{i}]";

            Vector2 oldValue = (Vector2)array.GetValue(i);
            SetHandleVector2(temp, origin, oldValue, obj, field, v => array.SetValue(v, i));
        }
    }
    // List
    else if (fieldType == typeof(List<Vector3>))
    {
        var list = field.GetValue(obj) as List<Vector3>;
        for (int i = 0; i < list.Count; i++)
        {
            string temp = label;
            if (!string.IsNullOrEmpty(label))
                temp += $" [{i}]";

            Vector3 oldValue = list[i];
            SetHandleVector3(temp, origin, oldValue, obj, field, v => list[i] = v);
        }
    }
    else if (fieldType == typeof(List<Vector2>))
    {
        var list = field.GetValue(obj) as List<Vector2>;
        for (int i = 0; i < list.Count; i++)
        {
            string temp = label;
            if (!string.IsNullOrEmpty(label))
                temp += $" [{i}]";

            Vector2 oldValue = list[i];
            SetHandleVector2(temp, origin, oldValue, obj, field, v => list[i] = v);
        }
    }
    // If you want to use position handles of other serializable collection, then add here or modify list part.
}
위 메서드에서 중요한 포인트는 Position Handle을 배치하고 필드의 값을 변경하기 위해 FieldInfo.GetValue()와 FieldInfo.SetValue() 메서드를 활용하고 있다는 점이다. 필드에 대한 정보만 알고 있다면 그 필드의 값을 얻거나 수정하는게 가능하다.
SetHandleVector3 & SetHandleVector2
이 메서드들은 각각 Vector3와 Vector2 타입의 값에 대해 실제로 Position Handle을 배치하고 값을 변경하는 메서드이다. 리플렉션을 통해 값을 수정하고 있기 때문에 Undo.RecordObject()와 PrefabUtility.RecordPrefabInstancePropertyModifications()를 호출해줘야 한다. 그런데 PrefabUtility.RecordPrefabInstancePropertyModifications()의 경우 유니티 공식문서에서는 호출하라고 적혀있지만 사용하지 않아도 기존 기능과 차이가 없다. 이유를 모르겠다.
1
2
3
4
5
6
7
8
9
10
11
12
13
14
15
16
17
18
19
20
21
22
23
24
25
26
27
28
29
30
31
32
33
34
35
36
37
38
39
// Create Position Handle for Vector3. If it's changed, set and record new value.
// You need to implement a mechanism to set the new Vector3 value in setValue delegate.
private void SetHandleVector3(string label, Vector3 origin, Vector3 oldValue, object obj, FieldInfo field, Action<Vector3> setValue)
{
    Handles.Label(origin + oldValue, label, style);
    EditorGUI.BeginChangeCheck();
    Vector3 newValue = Handles.PositionHandle(origin + oldValue, Quaternion.identity) - origin;
    if (EditorGUI.EndChangeCheck())
    {
        // enable ctrl + z & set dirty
        Undo.RecordObject(target, $"{target.name}_{target.GetInstanceID()}_{obj.GetHashCode()}_{field.Name}");

        setValue(newValue);

        // In the unity document, if the object may be part of a Prefab instance, we have to call this method.
        // But, even if i don't call this method, it works well. I don't know the reason.
        PrefabUtility.RecordPrefabInstancePropertyModifications(target);
    }
}

// Create Position Handle for Vector2. If it's changed, set and record new value.
// You need to implement a mechanism to set the new Vector2 value in setValue delegate.
private void SetHandleVector2(string label, Vector2 origin, Vector2 oldValue, object obj, FieldInfo field, Action<Vector2> setValue)
{
    Handles.Label(origin + oldValue, label, style);
    EditorGUI.BeginChangeCheck();
    Vector2 newValue = (Vector2)Handles.PositionHandle(origin + oldValue, Quaternion.identity) - origin;
    if (EditorGUI.EndChangeCheck())
    {
        // enable ctrl + z & set dirty
        Undo.RecordObject(target, $"{target.name}_{target.GetInstanceID()}_{obj.GetHashCode()}_{field.Name}");

        setValue(newValue);

        // In the unity document, if the object may be part of a Prefab instance, we have to call this method.
        // But, even if i don't call this method, it works well. I don't know the reason.
        PrefabUtility.RecordPrefabInstancePropertyModifications(target);
    }
}
7. 정리
우리는 MonoBehaviour에 대한 단 하나의 에디터만을 작성했으며 이를 모든 MonoBehaviour 컴포넌트 객체에 적용할 수 있다. 만약, 리플렉션을 활용하지 않으면 어떤 컴포넌트의 필드에 Move-Tool 기능을 구현하고 싶을 때마다 그 컴포넌트에 대한 에디터를 새롭게 작성하고, 그 필드에 값을 넣는 코드를 매번 작성해야 한다. 이는 굉장히 비효율적이다.
그러나 Reflection 을 활용하면 위와 같이 동적으로 제어할 수 있다. 개발자가 만든 어떤 타입의 어떤 필드에 Move-Tool 기능을 구현할 지는 모르겠지만, 개발자가 Move-Tool 기능을 구현해달라고 MoveToolAttribute를 선언만 하면, 자동으로 에디터는 이 Attribute를 인식해 관련된 필드 정보를 가져와 Move-Tool 기능을 구현하여, 값을 변경시켜준다.